Saturday, June 01, 2013

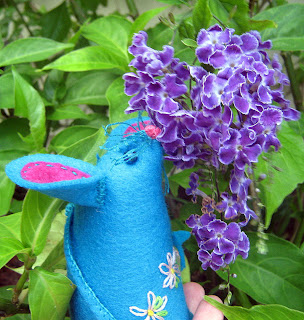
Garden Mouse

I went out to work in my garden today, and found I had a helper waiting for me. Lord knows, I sure could use the help! She's just a little mouse, but she sure seems to know her way around the plants. We made our first stop at a pot that was planted over two years ago by my granddaughter, Brianna. 

"These are Purple Queens", the little Garden Mouse Said.


 "They really should be weeded, you know."


I told her that I had been working on them, despite the clover and grass that she pointed out. "Maybe we should move along," she said, "I think I smell rain."


Next stop, the tomato planters. She supervised as I tied them up. They've gotten so top heavy that the wind blows them over. Last night a possum or a raccoon knocked two of them over and robbed me of some of my baby tomatoes. "Make sure you tie those knots tight!" Garden Mouse is a little bossy, I think.

"Oh, look! There's a baby tomato!"

We headed for the strawberry patch, but she was distracted by the flowers that grow outside my kitchen window. She may be bossy, she's also cute, so when she asked for a hand up so she could smell the flowers growing there, I was happy to oblige.


"Pretty, but no scent. Too bad!" commented Garden Mouse.


That's okay, I still like them!

We finally made it to the strawberry patch. Little mice do not walk very fast, especially when they have to stop and smell the flowers. 

"Where's the strawberries?" asked Garden Mouse. I told her that there weren't very many ripe one's right now, but if she looked carefully, she could probably find one or two.

"We'd better hurry, I still think it smells like rain!" said Garden Mouse.

"Garden Mouse? What's that in your hand?" said I.


"Oh, look! I found a baby strawberry! Now let's hurry inside before the rain starts!"

~~~~~~~~~~~~~~~~~~~~~~~~~~~

I made my little embroidered felt Garden Mouse with the help of a lovely tutorial and pattern I found at Inside NanaBread's Head. Pop on over there and try one out for yourself. They sure make nice company!


Tuesday, May 28, 2013

Bad Karma Pincushion

I wanted to practice my embroidery stitches yesterday, but I ran into a couple of setbacks. I'm on a limited income, so most of what I learn comes from either a book from the library, or the internet. I haven't been able to get to the library in a while, and for some unknown reason, there's a sparse selection of free beginner embroidery patterns on the internet. I don't know if I'm using the wrong search terms, or what. I just know I haven't had much luck finding a simple embroidery project to do. If anyone has some sites to share for a real beginner here, please do!

I finally found a cute idea for a pincushion to decorate with embroidery stitches, complete with a beautiful PDF file to print the pattern from. Problem number two: My printer ran out of ink. On Memorial Day. R-i-i-i-g-h-t. I figured out a solution to that problem. I used my laptop screen as a light-box, and traced my pattern onto a piece of white notebook paper using a felt-tipped marker. I felt pretty proud of myself for that!

The whole time I was embroidering my newest pincushion, I couldn't help but think to myself: 'Am I asking for bad karma here by making this?' Now that's he's finished, I've decided that he's too cute to worry about, though I don't know if I'll ever bring myself to stick a pin into him. So with no further ado, please meet my 'Bad Karma VooDoo Doll Pincushion'.


Kind of cute, don't you think? And I can see an improvement in my stitch-work. A friend actually thought the heart I did in a satin stitch was a fabric applique! I'm now working on a new embroidery sampler to use as a pincushion. New stitches to try, no pattern this time!


                                                       Happy crafting!


Monday, May 27, 2013

Start With a Twenty-Five Cent Picture Frame

I love shopping at thrift stores. I nearly always manage to find something that sparks my creative urges. A friend and I went shopping at our local Humane Society's Thrift Store, and I found a picture frame for only 25 cents. Not a great picture frame, it's only paper covered cardboard, but it gave me the opportunity to try something I've had in mind for a while now. I made a quilted picture frame pincushion. A little batting, a small piece of scrap fabric and some hot glue, and the 'quilting' part was finished.


 I crocheted a small pillow case, just big enough to fit into the window part of the photo frame with size 10 thread, and a size 5 hook. No fancy stitch work here, just a simple granny square stitch. I sewed a little pillow to fit inside out of more scrap fabric, sewed the case shut, and my pincushion was complete.


I made mistakes making this picture frame pincushion. I definitely need more practice working with fabric. There were small gaps in the fabric in the corners of the window frame, and I should have worked in smaller sections when I was gluing the pincushion into place. I dove into my craft stash, and pulled out some of my beading supplies. I hot glued a border of pearl ribbon in between the pincushion and the quilted part of the picture frame. It worked to pretty up my wonky glue job for the most part, but not for the corners. I hot glued some tear-drop shaped pearls into the corners. I love my hot glue gun!


 At this point, I was pretty much finished. It just didn't look .... complete to me. I decided it needed some pretty pins, so out came the bead supply again. A little more hot glue here to hold my bead arrangements in place, and I had some pretty pins to use in my quilted picture frame pincushion.


 I can see more of these picture frame pincushions in my future, but I'm not sure of they will be quilted like this or not. I'd love to try some embroidered, but I'm still working on my skills in that area.


This is the gift I made my dear husband for his birthday, A Little (Embroidered) Love Note wall hanging thanks to a tutorial I found at pinksuadeshoe.com. The wooden embroidery hoop is another thrift shop find. I don't have a sewing machine, so all my stitching was done by hand. It only took me three tries to embroider one that I felt comfortable giving to him. He liked my gift very much, and it now hangs right beside his desk.


Hope you all are enjoying this long holiday weekend. Happy crafting!

Wednesday, May 22, 2013

Pincushion Crazy... Still?

I don't think many if you know, but I suffer from Chronic Pancreatitus, My recent attack has lasted over a month, but I think I'm on the mend now. I've been able to eat solid food for three days now, a real reason to celebrate! I'm also seeing a wonderful Chiropractor for treatment of the ganglian cysts I have on my right wrist/hand, and it's made a big difference! Anyways, with all the 'down time' I've had lately, I've still been trying to keep busy, making... Yes, you guessed it! More pincushions!

This is a lovely africa flower pincushion I made with size 10 thread from a wonderful tutorial I found at Cherry Heart. It's meant to be made in yarn, but you know me!


I've also been working on improving my hand sewing skills. I found the free pattern for this cute little bird pincushion at Sharon Holland designs. I think it's really meant to be sewn with a machine, but it was easy enough for me to sew by hand. My only problem is I find this little bird so cute, I can't bear to even think of sticking a pin in her!


Practicing my sewing skills again, I made a strawberry pincushion, using wide white satin ribbon that my lovely daughter-in-law Robin gave me, and each bead individually hand sewn mind you, from a free pattern that unfortunately I can't find the link to right now. It's easy enough, just two pieces to make it, the beads were my own idea..


This is one of my recycling projects. It's actually the lid from one of those little jar candles you find at WalMart.. I just filled it with batting, made a cover from a scrap of fabric and a scrap of lace, added a ribbon and a string of pearls to cover where I hot glued the fabric and lace to the jar lid and finished it off with a pretty bead to cover the join.


The front of an Irish lace Pincushion.


And the back of the same pincushion, just a solid granny square actually.


 I'm big on recycling. This little pincushion was made with a pickle jar lid! This is a view of the top.


A mish mash photo of some of the pincushions I've been making these past weeks.


Another recycling project. A pincushion made from a soda bottle lid. Tiny, but cute, I think so at least.


 This tiny turtle pincushion was made from the lid to a milk carton! This was inspired by my dear friend, Lyric. Isn't he cute?


An elegant pincushion, made from two CD's, can you believe it? Top view...

 \
And a view of the bottom. Ignore my poor sewing skills, please?


 Same pattern as the white satin beaded strawberry, this one was made using old T-Shirts.


Another recycled CD Pincushion, this time covered with one of SnowCatchers Lovely snowflakes.


Another view of my white satin beaded strawberry pincushion.


A baby bootie, made with size 10 thread, converted into a pincushion. Not sure if I like it of not.


 The back side of a granny square pincushion made with size 10 thread..


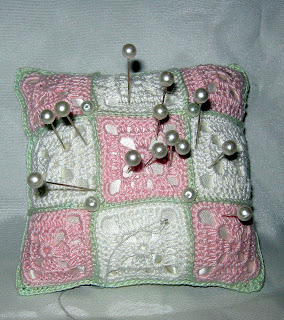
 And here's the front. Yes, I am already using it!


A crocheted tomato pincushion, meant to be made with ww yarn, but I made it with size 10 thread, and thought it would be cute to have a tomato that wasn't quite ripe. This one is one I'm not sure about either.


 I am already using it to hold my embroidery needles.


 Small size 10 thread pincushion, my own pattern this time! Front view....


And the back, another simple granny square pattern.

More views of my white satin beaded strawberry 
pincushion. This is definitely my favorite one so far!


Another view of the recycled CD Pincushion.


 Another view of the african flower pincushion, this time without the pins.


 Finally, a side view of the pickle jar lid pincushion.


Hello! My name is Marjorie, and I am addicted to making pincushions!